
Learning to tie a tie is one of those life skills that instantly makes you look more confident and well-presented. Whether it’s for a wedding, job interview, school event, or formal dinner, this simple skill can save you from last-minute stress.
The good news is that it’s much easier than it looks. Once you understand the basic steps, you can do it in just a minute or two.
Let’s break it down in a simple and practical way.
Basic Things to Know First
Before learning the process, it helps to understand a few basics:
- The wide end is the front part of the tie
- The narrow end stays shorter and mostly stable
- The knot forms around your collar
- Different knots create different styles
Once you understand these points, everything becomes easier.
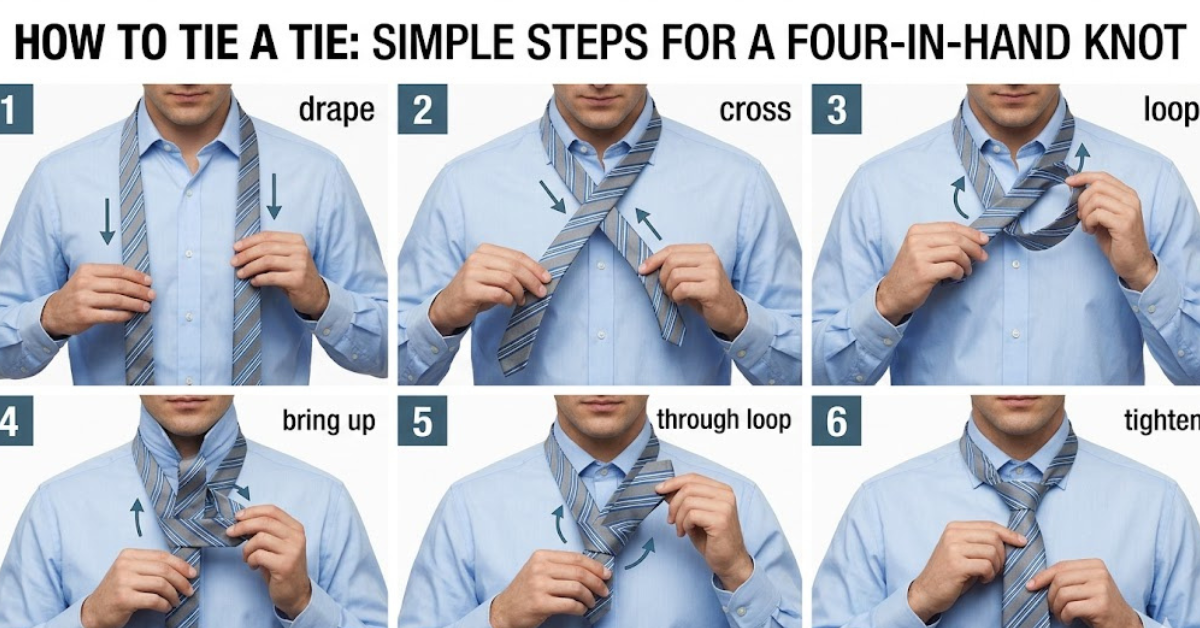
Step-by-Step Guide for Beginners
Here is a simple method anyone can follow:
1. Position the Tie
Place it around your neck
Wide end on the right, narrow end on the left
Make sure the wide end is longer
2. Cross the Wide End
Cross the wide end over the narrow end
3. Loop It
Bring the wide end under and through the neck loop
4. Form the Knot
Wrap it across the front
5. Finish
Pull the wide end through the front loop
Tighten gently and adjust
This is the foundation of most tie styles.
Easy Method for Beginners
If you want a simple starting point, go for the Four-in-Hand knot.
Why it’s easy:
- Fewer steps
- Quick to learn
- Works for most occasions
It’s the best option for beginners.
Half Windsor Knot
This is a popular professional style.
Steps:
- Cross the wide end over
- Loop it under and around
- Bring it through the neck loop
- Pass it through the front knot
- Tighten neatly
It creates a balanced, medium-sized knot suitable for office wear.
Full Windsor Knot
This is a more formal style.
Features:
- Larger, symmetrical knot
- Ideal for weddings and formal events
Basic idea:
- Cross the wide end
- Loop it multiple times through the neck space
- Form a symmetrical knot
- Tighten evenly
It works best with spread-collar shirts.
Double Windsor
A variation of the Full Windsor:
- Thicker and fuller knot
- Very formal appearance
- Common in weddings and special events
Tying a Tie for a Wedding
For weddings, the goal is a clean and elegant look.
Best choices:
- Full Windsor
- Half Windsor
Tips:
- Use a silk tie for a polished finish
- Keep the knot centered
- Ensure the tip reaches your belt buckle
Tying a Tie on Yourself vs Someone Else
On Yourself:
- Use a mirror
- Follow steps slowly
On Someone Else:
- Stand facing them
- Reverse your hand movements
- Adjust symmetry carefully
Fancy Tie Styles
If you want something more stylish or advanced:
- Eldredge knot
- Trinity knot
- Decorative variations
These are more complex and usually used for fashion statements.
Visual Learning
Many people find diagrams or videos helpful because:
- They show movement clearly
- Easier to follow than text
- Help reduce mistakes
Common Mistakes
Avoid these:
- Uneven tie length
- Over-tightening the knot
- Misaligned collar
- Skipping final adjustments
Small corrections make a big difference.
Quick Tips
- Always start with the wider end longer
- Practice in front of a mirror
- Match knot size with collar type
- Practice a few times before important events
FAQs
How long does it take to learn?
Most people learn the basics in 10–20 minutes.
What is the easiest knot?
The Four-in-Hand knot.
Which knot looks most professional?
The Half Windsor.
Can I learn without help?
Yes, it’s easy with step-by-step practice.
What is the most formal style?
The Full Windsor.
Conclusion
Learning this simple skill is a great way to improve your confidence and appearance. With a little practice, you can quickly master different knots and use them for any occasion—from interviews to weddings.
Once you practice a few times, it becomes natural and effortless.